Brinno Time Lapse - House Construction Cam First Download

2019 UPDATE: If you want an amazing new long term time lapse construction camera, please check out the Afidus ATL-200 at www.AfidusCam.com. We also have a web site dedicated to sales and support of time lapse cameras at www.TimeLapseCameras.com. Customer care is very important to us and we are here to ensure your time lapse project is a success.


Here is the first download from my current house construction time lapse project. This was quickly edited to 15 seconds as a short clip to show on Instagram. The final result will be the complete construction from start to finish. I downloaded this after a few weeks of work to see if my concerns about the mount, previously written about in my Breaking Rule 1 post, were as bad as I anticipated.

The mount is not as bad as I thought it would be. There is some image shifting but given I had no other mounting option, I will continue with this project as an example of mounting a camera to a less than ideal structure. There is some odd vertical movement which should be impossible and I cannot logically explain. My best guess is the fiberglass composite street light pole and the ground expand slightly throughout the course of the day, adding to the pole height. 

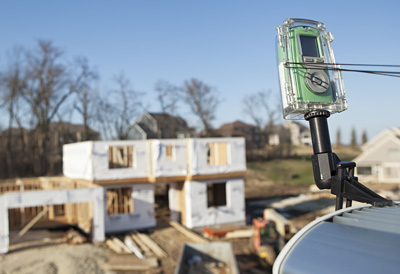
For this video the Brinno TLC 200 f/1.2 camera and housing are clamped to a street light with a Delkin Fat Gecko. I planned on fabricating a sturdier mount and using the Fat Gecko as a temporary solution. When I had pole vibration concerns, I thought this first download would be wasted footage. Now, I have decided to keep this camera in place and I will also leave the Fat Geko, which is working very well.

These two images give you a better idea of the mount from the camera's perspective. The Fat Geko works well on flat surfaces. My version, of the clamp, has two notches which grip the trim on the light housing perfectly. The black string is added as a safety measure to prevent the camera from falling to the ground should the clamp fail. The white on the camera is a note inside the housing. Although this camera was placed with permission from the utility company, the note provides contact information in case a utility worker does not know about the installation.

The shooting specs for this video are one capture every 10 minutes at 30 FPS. The video above does not modify these settings. All of the dead time was edited out in iMovie and it was tough to squeeze it into the 15 second Instagram format. The final movie will probably be around a minute long and I may choose to slow down the pace a little.

This house should be complete by August and I feel comfortable leaving this camera untouched for a month or so. I will have an update or two between now and the house's completion.

Brinno Time Lapse - File Size and Split Files

2019 UPDATE: If you want an amazing new long term time lapse camera, please check out the Afidus ATL-200 at www.AfidusCam.com. We also have a web site dedicated to sales and support of time lapse cameras at www.TimeLapseCameras.com. Customer care is very important to us and we are here to ensure your time lapse project is a success.


Questions pop up from time to time regarding SD Card format, file sizes and what happens when a file gets too big. A few people have expressed concern the camera will shut off, or stop recording once a maximum file size is reached.

My experience with the Brino TLC200 f/1.2 and Pro is the camera will not stop recording until either the card fills completely (32GB max) or the batteries run out.

A Brinno TLC200 Pro, folder screen shot, of a single video recorded in ASAP mode for about 48 hours. At 4.29 GB the maximum file size is reached and a new file is started.

A Brinno TLC200 Pro, folder screen shot, of a single video recorded in ASAP mode for about 48 hours. At 4.29 GB the maximum file size is reached and a new file is started.

SD cards are typically formatted as FAT 32, which is simply a standard file system compatible with both PCs and Macs. The maximum single file size allowed within FAT 32 is 4.29 GB. Once the recorded AVI file reaches 4.29 GB another file starts.

The camera does not stop recording and nothing changes when a new file is started other than a new file appearing on the card.

4.29 GB is a pretty good size time lapse movie and your files won't split unless you are shooting with short durations or over a long period of time. For reference, a movie shot with one capture every 15 minutes, 24 hours per day, for one month would be about 1 GB and around 1 minute 30 seconds long.

Now the question is what to do with the files. If you want to edit your movie, eliminating some boring content, add some music, etc. using a program like iMovie makes this simple work. In iMovie you can combine, edit and create a polished version of your movie. iMovie is a great simple program for editing time lapses and offers the ability to explore more complex editing.  FinalCut, Premier and others work equally well too, even better if you know what you are doing.

If you just want to combine your movie for a simple final result, freeware is available to do this basic task. A search for "AVI Joiner"  will provide you with a few options.

BanksPhotos offers a time lapse editing service. If you want a professional feel for your video and you lack the knowledge or skills to do it yourself contact us today and we'll discuss your editing needs.

Brinno Time Lapse - Breaking Rule 1

2019 UPDATE: If you want an amazing new long term time lapse camera, please check out the Afidus ATL-200 at www.AfidusCam.com. We also have a web site dedicated to sales and support of time lapse cameras at www.TimeLapseCameras.com. Customer care is very important to us and we are here to ensure your time lapse project is a success.


A few days ago I posted about how important it is to have a sturdy mount for your long term time lapse projects. I even called this Rule 1 and rambled on about how this is the only rule you need to follow, the rest is up to you. Well, I broke Rule 1 and mounted a time lapse camera in a less than ideal location and now it will be a few months before I find out how bad this decision was.

A local builder contacted me about doing a time lapse house construction project form start to finish. My first task was to scout the location which turned out great. It was going to be a nice home with a south facing front, as an added bonus there was a street light, across the street from the house which would serve as a perfect mount for a camera, or so I thought.

I do a lot of work with our local utility company so I contacted them for permission to use the light. Permission granted, now I was going to construct a sturdy mount for the camera. I got a call from the builder the morning digging started which was a week earlier than originally planned. I didn't start on my custom mount but I had to do something quick, the custom mount could wait. I grabbed a few clamps and this is what I rigged up.

At the time of installation I immediately noticed how unstable the light pole was. The pole moves with a very slight touch. I would never have thought the pole would move as much as it did, sure a strong wind may cause some problems and I could accept that. I did not expect one finger would make the pole move. The LED light does not weigh much so the pole does not need to be as sturdy as a conventional street light.

I had no choice, the digging was starting across the street and the light pole was the only option. Using a Fat Geko clamp I positioned the camera. I added a note in the camera housing stating the camera was placed with permission in case an uninformed utility worker decided it should come down. I also attached a nylon cord to prevent the camera from hitting the ground should the clamp give way.

I have downloaded the first week of video and yep it shakes. However, the builder and others still like it so the camera is staying put. I will post a sample clip here once I have a bit more action to show what not to do with your long term time lapse.

Brinno Time Lapse - Rule 1... The Only Rule

2019 UPDATE: If you want an amazing new long term time lapse camera, please check out the Afidus ATL-200 at www.AfidusCam.com. We also have a web site dedicated to sales and support of time lapse cameras at www.TimeLapseCameras.com. Customer care is very important to us and we are here to ensure your time lapse project is a success.


There are no rules to creating a time lapse, your movie can be whatever you envision. However, I am making a rule for any long term time lapse. You must have a sturdy mount! There that's it, the one rule. I do a considerable amount of construction time lapse movies and spend some time watching those of others. The most annoying thing, in my opinion is swaying and movement caused by an inadequate mount. Even worse could be an abrupt jarring which shifts the camera position.

A sturdy mount is easy to accomplish if you are doing a short time lapse. A windowsill works, until the dog's tail smacks the camera, a supervised tripod is fine for a sunset. A sturdy mount becomes more of a challenge when you have a project which will last weeks or months, especially if you need to change batteries and handle the camera.

I have custom fabricated mounts for long term projects. I use sturdy clamps, zip ties, bolts and don't mess around with something which might fail. I also look at the mounting surface stability, avoiding a tree which may sway in the wind, anything within easy reach and I always consider the worst case scenario.

Brinno-Time-Lapse-Mount

I am the most comfortable when the camera is bolted or screwed to a fixed object, a large tree, a construction beam, etc. This is especially true if I will need to change batteries or want to download from the card occasionally to show progress videos.

The Brinno housings work very well with a fixed mount, the tripod mount is a part of the back door, the housing front and camera can be be swung open without changing the mount position.  This allows the camera to be removed and replaced without changing the lens position. I will caution, this can be a challenging maneuver especially if the camera is 100' feet in the air.

There are some very good clamp options in the photography market which work well for the Brinno cameras and housings. I would use these when engineering something is not an option or when I needed a quick mount for a one day to few week project. So far, I have tested and recommend the following...

Manfrotto Super Clamp - The stud (threaded brass piece) screws into the Brinno camera or housing. This clamp works very well on a round surface.

Delkin Fat Geko - I like the adjustable stem of this mount. It is quite secure on a flat surface and holds well.

In summary, do what you can to firmly mount your camera your viewers will thank you.

Brinno Time Lapse - Case Study - Water Reservoir Construction

2019 UPDATE: If you want an amazing new long term time lapse camera, please check out the Afidus ATL-200 at www.AfidusCam.com. We also have a web site dedicated to sales and support of time lapse cameras at www.TimeLapseCameras.com. Customer care is very important to us and we are here to ensure your time lapse project is a success.


Demolition and construction of Rochester Public Utilities 4th St. Reservoir was my first long term time lapse project. The camera was to be mounted on a water tower with no access to electricity. Exposed to the variable Minnesota weather, with possible extreme winds for six months.

After extensive research, detailed in a previous post, I purchased a Brinno TLC200 f1.2 camera and weatherproof housing from Amazon. 

My first issue was a sturdy mount for the camera so I scouted the water tower. There was a iron railing just below the upper tank, two existing holes were drilled in the railing providing a good anchor point for a mount. Additionally there was a support pillar which extended beyond the railing which would obscure the lens if the camera were mounted directly to the railing. While scouting a few other things became apparent, there were bird droppings in the area and the tower was having some work done.

So I came to the conclusion I needed a fixed mount, which extended beyond the railing, something which would last for months and could survive just about anything. This is what I came up with.

Brinno-Time-Lapse-Tower-Mount

The camera was removed at the time of these photos and will be replaced soon for the final reservoir painting and landscaping. This mount is a steel creation of my own, I bent some flat steel into a C-shape for the housing and cut out the back to access the controls. The housing is screwed to the bottom of the C using the tripod mount. The back of the C was cut out to access the controls and the housing tabs are secured with zip-ties on each side. The C is mounted to the main support with one bolt to allow vertical tilt adjustment. The main bar is welded to a steel plate with a number of randomly drilled holes. The plate holes allow for horizontal adjustment within the predrilled railing holes. I did not want to climb up and down a water tower a number of times to get the mount right, nor did I want to haul tools up to drill through steel. I went overboard on the adjustment holes but I only had to take two wrenches with to get the bracket installed.

This mount won't budge. The overhang on the C was a little piece of mind for the bird dropping issues and also offered protection from ropes if the exterior of the tower was being worked on. Overall this mount worked very well and I don't know if I would do anything differently.

The next question was how often to capture a picture. I wanted the video to play back at around 30 frames per second to avoid the stuttering time lapse look. When the project started Brinno did not offer a timer feature would would eliminate overnight recording so the camera was constantly taking pictures. I decided to go with one capture every 15 minutes and decided to do a 48 hour test. The test worked well, I restarted the camera, climbed down the tower and hoped for the best.

According to Brinno, the camera should last for 78 days with a capture every 15 minutes. 78 days was a long time to gamble with a camera so exposed to the elements. A lighting strike, the bird I have mentioned a few times, equipment failure, etc. were all a possibility. I started off checking the camera about every two weeks, I would do a battery change and download the video. Every two weeks eventually changed to once a month. I had no problems with the camera or birds but now I was faced with the task of editing the footage.

Above is the finished video, here is what the camera captured. As I mentioned the timer functionality could have eliminated the nights and allowed the video to be stitched together with decent results. However, the night scenes were fine for the progression videos I was posting and without nights the videos would have been quite short.

Now the task of editing began. I had about 10 minutes of footage for the six months. A program like iMovie could bring the clips together and allow for the removal of nights but I wanted more, music, the month of construction displayed and a nice intro screen. Eric Berg has much more video editing experience than I, using Final Cut Pro, a stock audio track and some creativity he produced the video at the top of this page. All of the nights, downtime and weekends were eliminated, along with portions where rain obscured the view. The 10 minutes were cut down to a little over three and we had a video our client was very pleased with.

Brinno - The Beginning

2019 UPDATE: If you want an amazing new long term time lapse camera, please check out the Afidus ATL-200 at www.AfidusCam.com. We also have a web site dedicated to sales and support of time lapse cameras at www.TimeLapseCameras.com. Customer care is very important to us and we are here to ensure your time lapse project is a success.


My relationship with Brinno happened by chance, I guess you could say I was discovered. Back in early 2013 a client asked me to do a long term time lapse project of a water tower being constructed. The goal seemed simple, a two to three minute YouTube video of the project as a public interest piece. I did not need to provide a live web feed but an occasional progression clip would be a bonus in the eye of my client.

A time lapse movie, although not new to me, presented a unique challenge in this situation. The camera was to be mounted on one water tower while filming the construction of a new tower over the course of six months.

My first task was researching camera options. The know issues were this installation had no access to power, the mount would be entirely outdoors and in Minnesota the temperature swing can be extreme.

Six months was way beyond the duration of DSLR camera. It could be done but would require a housing, intravalometer and frequent attention for battery changes.

I looked into and tested a trail camera with a built in intravalometer. A trail camera is great if you want to capture a deer, bear or other critter lurking in the woods but it was not well suited for my tower project. 

My next thought was a GoPro or action camera with a time lapse feature. These cameras are great for what they do, but would require modification to extend the battery life and the time lapse functionality.

I looked into construction camera service providers. Some provide everything we needed, however, with ongoing costs. One of the larger providers was at $5,000 for equipment and $500 per month for the service, well beyond the budget of our simple project.

Eventually I ran across the Brinno web site, read the information and ordered a TLC200 f1.2 camera and weatherproof housing from Amazon. I could not believe all of my research came together in one simple to use and relatively inexpensive product. I did not read any reviews, I needed this camera.

The Brinno camera was installed and worked flawlessly for the six month duration. I will provide additional technical details in a later blog entry. At the completion of the construction we produced a compelling short video of the entire project and posted it on YouTube.

Within a week of the video's posting I was contacted by the Social Media Director for Phase3 Systems, the North America distributor for Brinno. Apparently, the tower video was one of the most extensive projects completed using a Brinno camera and Phase3 wanted additional details.

I provided some information and had a phone conversation with Chris Adams the President of Phase3. I had many thoughts and ideas regarding marketing and services which could be provided to end users. Over a short period of time, we built up a relationship and I was providing some real world technical experience to other end users.

Now, we are working on a Brinno Authorized Solutions Provider program and I am very excited to get started with this new venture. Essentially, I am the first of a number of planned providers who assist people in making the most out of their time lapse videos. The camera itself does a great job but there are considerations which are specific to each project. How will the camera get mounted, how often should a photo be captured, etc. After the video is complete some editing work may be desired which is a service we can provide.

I am very exited to continue my work with Brinno. I am experimenting with different time lapse projects, shooting situations and variables. Future blog posts will include real world examples, more Solutions Provider information, tips and suggestions.

For long duration time lapse, simplicity and cost there is no better time lapse solution than Brinno. From local installations in the Rochester, Minnesota area to assisting other end users, we are here to help.


Why I Selected Squarespace for my Site

The last version of my web site powered by Viewbook lacked content, had Flash only galleries and very limited growth options, but served me well for a couple of years.

The last version of my web site powered by Viewbook lacked content, had Flash only galleries and very limited growth options, but served me well for a couple of years.

There are many good template driven web site programs available for photographers to showcase their work and I have used a few of them. With this latest update to my site I really wanted to focus on content rather than just a flashy portfolio. I have things to say and the other sites just fell short on options.

My final decision was between Squarespace and Photoshelter. As a photographer I really wanted to make Photoshelter work for me, they provide some excellent resource materials and I highly regard what they have to offer. However, I have different services, wanted a blog, text on my home page and more. With Photoshelter the only way it appeared I could accomplish what I wanted was by using a WordPress theme, manual customization and pulling a blog from a third party service. I even looked into hiring a Photoshelter Certified Consultant to get to the point I wanted with a price estimate of over $2,000.

Maybe I just did not get past the research stage with Photoshelter and give them a fair chance. If you solely want to show off your work, sell some photos and still have a very nice site Photoshelter may work for you.

I signed up for the Squarespace free trial and am now not looking back. The first thing I noticed is there is no credit card required for the two week demo period. You have nothing to loose, sign up today and start building an impressive site now.

Everything within this site, including the blog is created with drag and drop simplicity. Some formatting took some getting used to but if you take the full two weeks and play with it on and off you will be surprised with what you can accomplish.

The Squarespace example sites give you a good feeling for what you can do but don't showcase the full potential of what you have available on the editing side. You really need to dig in and try it out. After some practice you will be amazed with the simplicity, options and what you can accomplish without any coding or headaches.

For those not looking for a portfolio site Squarespace is an excellent fit for any small business or organization. Squarespace makes it so easy to have a nice looking web site up and running quickly at a starting price of only $8.00 per month.

All-in-all, I am very satisfied with my Squarespace experience. I will add to this blog as time goes on and let you know how well it grows with me and its performance on search engines.