McDonald's Restaurant Time Lapse with the Brinno Construction Cam

2019 UPDATE: If you want an amazing new long term time lapse construction camera, please check out the Afidus ATL-200 at www.AfidusCam.com. We also have a web site dedicated to sales and support of time lapse cameras at www.TimeLapseCameras.com. Customer care is very important to us and we are here to ensure your time lapse project is a success.


I have wanted to do a time lapse construction project everybody could relate to and finally all of the pieces came together. With permission from the general contractor, Alvin E Benike, Inc and the McDonald's franchisee, Courtesy Corporation this video features four months of construction condensed into three minutes. Work took place in Rochester, Minnesota from April to August, 2014.

Using the gear icon on the player, select 720 for the best quality.

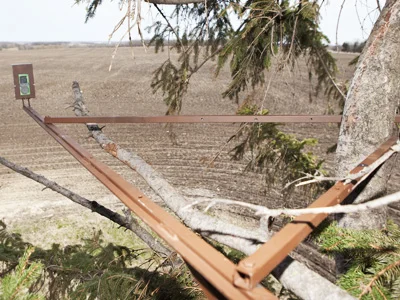
The exterior portions of the video were created using the Brinno BCC 100 Time Lapse Construction Camera. This is a great, inexpensive ($270.00) camera which comes with a weather proof housing and is suitable for construction projects of all sizes. Whether laying brick or building a skyscraper the BCC100 is perfect for long or short term project documentation.

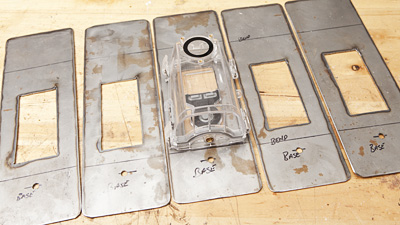
I mounted the camera, using one of my custom brackets, to a board, held in place on top of the job site trailer with sandbags. The camera was set to capture one frame every 10 minutes and the timer was utilized to only have the camera run during working hours. Over the course of four months, I only checked the camera once, downloaded the card and changed the batteries. I am quite confident the camera would have run for the full duration without any intervention.

I did not have too many opportunities to film the interior work. However, on the next project I will make it a point as I feel it added interest and variety to the final video.

The interior was captured with a Brinno TLC 200 Pro time lapse camera, also mounted in the weather resistant housing. I used a suction cup and ball head to affix the camera to a window above the door. This camera was set to capture a frame every five to 10 seconds, depending on the day.

At the end of the project I had about six minutes of exterior footage and five minutes of interior. With a long term time lapse the amount of editing work needs to be considered at the start of project. I want more footage than I need but not too much creating excessive editing work. At one capture every 10 minutes, played back at 30 frames per second (FPS) a full day of work is shown in three seconds. At the start, this may not seem like much, but over the course of four months, three seconds per day turns into six minutes. Since the camera was on a timer, all of the days could have been easily combined to make a longer, albeit, less interesting video. We removed weekends, down time and portions where rain obscured the lens.

The final edit, included the addition of music, logos, title and credit screens. The Brinno cameras create AVI movies, so much of the work is already done. Editing really only involves removing content you don't want and adding whatever you want to finalize your video. You can accomplish all of this with software already on your computer, Mac users should have iMove and PC users Windows Movie Maker. With a little patience you can create a polished time lapse movie of your project. If you are excited about the low cost and simplicity of creating your own time lapse but don't want to deal with editing we would be happy to provide you with a quote for the assistance you need.

Anyone in the construction industry should consider a time lapse camera for both marketing and project documentation. Whether you are a general contractor, a house builder, bricklayer, painter, counter installer, etc. what better way to show off your work than a time lapse. The Brinno cameras make this so easy and people watch time lapse movies to see what unfolds. The unique marketing opportunity alone makes purchasing a $270 camera an easy decision. Create videos for your web site, post them on Facebook, Instagram or Tweet them. People watch time lapse videos just to watch which builds awareness for you business. I have mentioned before, time lapse videos are great at a home show or trade show and serve as an ice breaker with visitors often asking the first questions.

In closing, I leave you with a photo I took the night before the grand opening.

McDonalds-Restaurant-New-Exterior-Night

Brinno Time Lapse - House Construction Project Final Video

2019 UPDATE: If you want an amazing new long term time lapse construction camera, please check out the Afidus ATL-200 at www.AfidusCam.com. We also have a web site dedicated to sales and support of time lapse cameras at www.TimeLapseCameras.com. Customer care is very important to us and we are here to ensure your time lapse project is a success.


I temporarily dropped the ball with my blog updates to concentrate on the new www.BrinnoUSA.com web site which is coming along quite well. More on that later, now back to my ongoing projects.

Here is the end result of a seven month house construction project started in March, 2014. Select 720 with the gear icon, in the player, for the best quality.

Originally, this was going to be a shorter video. However, we decided to have the video playing at the Parade of Homes show and a local builder's show. We wanted the movie to engage people without overwhelming. As it turned out, people stand around just to watch the action,  the video is a great ice breaker and draws people in.

The one disappointment, for me, was the mount. I placed the camera on top of a fiberglass street light pole which must have expanded and contracted throughout the day causing the view to shift slightly.

Various aspects of this project were highlighted in previous posts...

Brinno Time Lapse - House Construction Cam First Download

Brinno Time Lapse - Breaking Rule 1

I used the Brinno TLC 200 f1.2 camera which is now bundled as a complete package with weather resistant housing, the Brinno BCC100 Construction Cam. Capture was one frame every 10 minutes and the camera timer was set for working hours only.

Using the timer, a new AVI file was created every day. In editing, the files were combined, uneventful portions removed and music and text were added. This whole process is something most anyone could accomplish, the editing can be time consuming but we are very willing to provide editing services if you want help creating a polished video.

The camera itself could not be easier to use, read the instructions, spend a few minutes getting it configured, place it in the housing and start recording. Over seven months to create this video I checked the camera twice, downloaded the files and changed the batteries. With a Brinno camera it takes very little effort to record a long duration time lapse.

Brinno Time Lapse - A Look at My Mount Construction

2019 UPDATE: If you want an amazing new long term time lapse camera, please check out the Afidus ATL-200 at www.AfidusCam.com. We also have a web site dedicated to sales and support of time lapse cameras at www.TimeLapseCameras.com. Customer care is very important to us and we are here to ensure your time lapse project is a success.


I have written about the importance of sturdy mounts when doing a long term time lapse project. Few have any idea what I am willing to create in order to have a steady mount throughout the duration of a project.

I don't want any inadvertent camera movement, I don't want to worry about high winds or a bird taking care of business on my camera. I want to change batteries and download the videos without disturbing the position of the camera. Essentially I want a custom fabricated, welded, bolted, chunk of steel to hold my camera for six months or more.

Simpler mounts will work and I have talked of my successes with basic clamps. However, when I get into the 30 day or longer range I typically create a custom solution which works for me. My goal with this post is to show the amount of consideration that goes into the preparation for some of my projects, which I will detail in future posts.

Brinno-Construction-Cam-Time-Lapse-Mount

For now, onto the mounts. This past week I was starting two long term projects. One camera was to be mounted to a tree for seven months. The other was to be placed on top of a construction job site trailer for about five months. The owners of the tree did not want any major branch trimming and I could not bolt or clamp anything to the construction trailer. Here are the end results of my two mounts.

The first, is the construction cam trailer mount. The bracket is steel mounted to a board which will be detailed later. The bags are about 100 pounds of sand resting on the board. This camera sits about 15 feet above the work site and will be in place until the project's completion.

The other mount is in a large pine tree overlooking a farm field. This mount is by far my most complex and random creation. I did not want to go back and forth from the tree to fabrication, nor did I want to make changes onsite so I made this semi-adjustable. Keeping with the tree owner's request to not trim major branches, the main bar sticks out eight feet from the tree truck.

Brinno-Farm-Time-Lapse-Tree-Mount2
Brinno-Farm-Time-Lapse-Tree-Mount.jpg

Here is an overview of how I make these, not a step by step tutorial, just something to give you an idea of what I do to create them. I did all this with metal stock in my garage, however all of the components could be found at Lowe's, Home Depot, Menard's, Fleet Farm, etc. If you don't want to jump in this deep or have the tools to do so, I can envision something built well from wood or even a repurposed bread loaf pan. The point here is to make sure your long term camera moves as little as possible.

I needed to build two mounts, since the camera bracket is the same for every mount and the most time consuming to create I decided to build five brackets. Why five? Well the piece of steel I had laying around was large enough to allow for five. Two were going up, giving me three spares for other projects.

Brinno-Time-Lapse-Mount-Layout

The first step is laying out the mount cut lines on the steel. The steel is 1/16th of an inch thick, sturdy, yet quite easy to work with mild force.

Brinno-Mount-Plasma-Cutter

Next, I used a plasma cutter to cut the steel into smaller strips and a hole in the back of each so the camera controls can be accessed and LCD screen visible. Most people probably don't have a plasma cutter sitting around. An angle grinder with a cutting wheel would work. The center could be cut with holes drilled at each corner and a hacksaw used to cut the sides. But the plasma cutter was my tool of choice and it slices through this thin stuff with ease.


Brinno-Mount-Blanks

Here are the mount blanks after cutting and grinding the corners to remove sharp edges. I drilled a hole in each base for a mounting screw which will go into the weather resistant housing. I also drilled two small holes along the left and right edges for a cable ties to run through the side housing holes and through the steel.

Next is bending the blanks into the final form. A large vise and hammer took care of this task without much effort.

Next is bending the blanks into the final form. A large vise and hammer took care of this task without much effort.

Here are the mounts after cutting and bending.

Here are the mounts after cutting and bending.

Brinno-Mount-Welding.jpg

I weld tabs on the bases which will bolt, typically to another bar, for the mount anchor. Without a welder I would probably use angle iron and drill and bolt it to the base.

Below left is the finished construction trailer roof mount. The camera bracket is adjustable for tilt. The post is welded to a drilled plate which is mounted to a wood board. In the first picture the sandbags are over the wood and everything is painted to prevent rust and rot.

The last image is my complex tree mount, before painting, which admittedly, grew into something much more complex than I had planned.  At this length the wind would cause unwanted camera movement. I built this mount so the cross braces could either be bolted to each other or to the tree which is what I did with the final mounting. The large angle bracket is attached with two lag screws and each cross bar have one lag screw into the tree.

Finished construction trailer mount.

Finished construction trailer mount.

Tree mount before painting.

Tree mount before painting.

Brinno Time Lapse - Breaking Rule 1

2019 UPDATE: If you want an amazing new long term time lapse camera, please check out the Afidus ATL-200 at www.AfidusCam.com. We also have a web site dedicated to sales and support of time lapse cameras at www.TimeLapseCameras.com. Customer care is very important to us and we are here to ensure your time lapse project is a success.


A few days ago I posted about how important it is to have a sturdy mount for your long term time lapse projects. I even called this Rule 1 and rambled on about how this is the only rule you need to follow, the rest is up to you. Well, I broke Rule 1 and mounted a time lapse camera in a less than ideal location and now it will be a few months before I find out how bad this decision was.

A local builder contacted me about doing a time lapse house construction project form start to finish. My first task was to scout the location which turned out great. It was going to be a nice home with a south facing front, as an added bonus there was a street light, across the street from the house which would serve as a perfect mount for a camera, or so I thought.

I do a lot of work with our local utility company so I contacted them for permission to use the light. Permission granted, now I was going to construct a sturdy mount for the camera. I got a call from the builder the morning digging started which was a week earlier than originally planned. I didn't start on my custom mount but I had to do something quick, the custom mount could wait. I grabbed a few clamps and this is what I rigged up.

At the time of installation I immediately noticed how unstable the light pole was. The pole moves with a very slight touch. I would never have thought the pole would move as much as it did, sure a strong wind may cause some problems and I could accept that. I did not expect one finger would make the pole move. The LED light does not weigh much so the pole does not need to be as sturdy as a conventional street light.

I had no choice, the digging was starting across the street and the light pole was the only option. Using a Fat Geko clamp I positioned the camera. I added a note in the camera housing stating the camera was placed with permission in case an uninformed utility worker decided it should come down. I also attached a nylon cord to prevent the camera from hitting the ground should the clamp give way.

I have downloaded the first week of video and yep it shakes. However, the builder and others still like it so the camera is staying put. I will post a sample clip here once I have a bit more action to show what not to do with your long term time lapse.

Brinno Time Lapse - Rule 1... The Only Rule

2019 UPDATE: If you want an amazing new long term time lapse camera, please check out the Afidus ATL-200 at www.AfidusCam.com. We also have a web site dedicated to sales and support of time lapse cameras at www.TimeLapseCameras.com. Customer care is very important to us and we are here to ensure your time lapse project is a success.


There are no rules to creating a time lapse, your movie can be whatever you envision. However, I am making a rule for any long term time lapse. You must have a sturdy mount! There that's it, the one rule. I do a considerable amount of construction time lapse movies and spend some time watching those of others. The most annoying thing, in my opinion is swaying and movement caused by an inadequate mount. Even worse could be an abrupt jarring which shifts the camera position.

A sturdy mount is easy to accomplish if you are doing a short time lapse. A windowsill works, until the dog's tail smacks the camera, a supervised tripod is fine for a sunset. A sturdy mount becomes more of a challenge when you have a project which will last weeks or months, especially if you need to change batteries and handle the camera.

I have custom fabricated mounts for long term projects. I use sturdy clamps, zip ties, bolts and don't mess around with something which might fail. I also look at the mounting surface stability, avoiding a tree which may sway in the wind, anything within easy reach and I always consider the worst case scenario.

Brinno-Time-Lapse-Mount

I am the most comfortable when the camera is bolted or screwed to a fixed object, a large tree, a construction beam, etc. This is especially true if I will need to change batteries or want to download from the card occasionally to show progress videos.

The Brinno housings work very well with a fixed mount, the tripod mount is a part of the back door, the housing front and camera can be be swung open without changing the mount position.  This allows the camera to be removed and replaced without changing the lens position. I will caution, this can be a challenging maneuver especially if the camera is 100' feet in the air.

There are some very good clamp options in the photography market which work well for the Brinno cameras and housings. I would use these when engineering something is not an option or when I needed a quick mount for a one day to few week project. So far, I have tested and recommend the following...

Manfrotto Super Clamp - The stud (threaded brass piece) screws into the Brinno camera or housing. This clamp works very well on a round surface.

Delkin Fat Geko - I like the adjustable stem of this mount. It is quite secure on a flat surface and holds well.

In summary, do what you can to firmly mount your camera your viewers will thank you.

Brinno Time Lapse - Case Study - Water Reservoir Construction

2019 UPDATE: If you want an amazing new long term time lapse camera, please check out the Afidus ATL-200 at www.AfidusCam.com. We also have a web site dedicated to sales and support of time lapse cameras at www.TimeLapseCameras.com. Customer care is very important to us and we are here to ensure your time lapse project is a success.


Demolition and construction of Rochester Public Utilities 4th St. Reservoir was my first long term time lapse project. The camera was to be mounted on a water tower with no access to electricity. Exposed to the variable Minnesota weather, with possible extreme winds for six months.

After extensive research, detailed in a previous post, I purchased a Brinno TLC200 f1.2 camera and weatherproof housing from Amazon. 

My first issue was a sturdy mount for the camera so I scouted the water tower. There was a iron railing just below the upper tank, two existing holes were drilled in the railing providing a good anchor point for a mount. Additionally there was a support pillar which extended beyond the railing which would obscure the lens if the camera were mounted directly to the railing. While scouting a few other things became apparent, there were bird droppings in the area and the tower was having some work done.

So I came to the conclusion I needed a fixed mount, which extended beyond the railing, something which would last for months and could survive just about anything. This is what I came up with.

Brinno-Time-Lapse-Tower-Mount

The camera was removed at the time of these photos and will be replaced soon for the final reservoir painting and landscaping. This mount is a steel creation of my own, I bent some flat steel into a C-shape for the housing and cut out the back to access the controls. The housing is screwed to the bottom of the C using the tripod mount. The back of the C was cut out to access the controls and the housing tabs are secured with zip-ties on each side. The C is mounted to the main support with one bolt to allow vertical tilt adjustment. The main bar is welded to a steel plate with a number of randomly drilled holes. The plate holes allow for horizontal adjustment within the predrilled railing holes. I did not want to climb up and down a water tower a number of times to get the mount right, nor did I want to haul tools up to drill through steel. I went overboard on the adjustment holes but I only had to take two wrenches with to get the bracket installed.

This mount won't budge. The overhang on the C was a little piece of mind for the bird dropping issues and also offered protection from ropes if the exterior of the tower was being worked on. Overall this mount worked very well and I don't know if I would do anything differently.

The next question was how often to capture a picture. I wanted the video to play back at around 30 frames per second to avoid the stuttering time lapse look. When the project started Brinno did not offer a timer feature would would eliminate overnight recording so the camera was constantly taking pictures. I decided to go with one capture every 15 minutes and decided to do a 48 hour test. The test worked well, I restarted the camera, climbed down the tower and hoped for the best.

According to Brinno, the camera should last for 78 days with a capture every 15 minutes. 78 days was a long time to gamble with a camera so exposed to the elements. A lighting strike, the bird I have mentioned a few times, equipment failure, etc. were all a possibility. I started off checking the camera about every two weeks, I would do a battery change and download the video. Every two weeks eventually changed to once a month. I had no problems with the camera or birds but now I was faced with the task of editing the footage.

Above is the finished video, here is what the camera captured. As I mentioned the timer functionality could have eliminated the nights and allowed the video to be stitched together with decent results. However, the night scenes were fine for the progression videos I was posting and without nights the videos would have been quite short.

Now the task of editing began. I had about 10 minutes of footage for the six months. A program like iMovie could bring the clips together and allow for the removal of nights but I wanted more, music, the month of construction displayed and a nice intro screen. Eric Berg has much more video editing experience than I, using Final Cut Pro, a stock audio track and some creativity he produced the video at the top of this page. All of the nights, downtime and weekends were eliminated, along with portions where rain obscured the view. The 10 minutes were cut down to a little over three and we had a video our client was very pleased with.