2019 UPDATE: If you want an amazing new long term time lapse camera, please check out the Afidus ATL-200 at www.AfidusCam.com. We also have a web site dedicated to sales and support of time lapse cameras at www.TimeLapseCameras.com. Customer care is very important to us and we are here to ensure your time lapse project is a success.


I have written about the importance of sturdy mounts when doing a long term time lapse project. Few have any idea what I am willing to create in order to have a steady mount throughout the duration of a project.
I don't want any inadvertent camera movement, I don't want to worry about high winds or a bird taking care of business on my camera. I want to change batteries and download the videos without disturbing the position of the camera. Essentially I want a custom fabricated, welded, bolted, chunk of steel to hold my camera for six months or more.
Simpler mounts will work and I have talked of my successes with basic clamps. However, when I get into the 30 day or longer range I typically create a custom solution which works for me. My goal with this post is to show the amount of consideration that goes into the preparation for some of my projects, which I will detail in future posts.

For now, onto the mounts. This past week I was starting two long term projects. One camera was to be mounted to a tree for seven months. The other was to be placed on top of a construction job site trailer for about five months. The owners of the tree did not want any major branch trimming and I could not bolt or clamp anything to the construction trailer. Here are the end results of my two mounts.
The first, is the construction cam trailer mount. The bracket is steel mounted to a board which will be detailed later. The bags are about 100 pounds of sand resting on the board. This camera sits about 15 feet above the work site and will be in place until the project's completion.
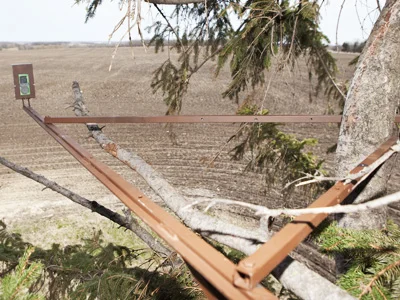
The other mount is in a large pine tree overlooking a farm field. This mount is by far my most complex and random creation. I did not want to go back and forth from the tree to fabrication, nor did I want to make changes onsite so I made this semi-adjustable. Keeping with the tree owner's request to not trim major branches, the main bar sticks out eight feet from the tree truck.

Here is an overview of how I make these, not a step by step tutorial, just something to give you an idea of what I do to create them. I did all this with metal stock in my garage, however all of the components could be found at Lowe's, Home Depot, Menard's, Fleet Farm, etc. If you don't want to jump in this deep or have the tools to do so, I can envision something built well from wood or even a repurposed bread loaf pan. The point here is to make sure your long term camera moves as little as possible.
I needed to build two mounts, since the camera bracket is the same for every mount and the most time consuming to create I decided to build five brackets. Why five? Well the piece of steel I had laying around was large enough to allow for five. Two were going up, giving me three spares for other projects.

The first step is laying out the mount cut lines on the steel. The steel is 1/16th of an inch thick, sturdy, yet quite easy to work with mild force.

Next, I used a plasma cutter to cut the steel into smaller strips and a hole in the back of each so the camera controls can be accessed and LCD screen visible. Most people probably don't have a plasma cutter sitting around. An angle grinder with a cutting wheel would work. The center could be cut with holes drilled at each corner and a hacksaw used to cut the sides. But the plasma cutter was my tool of choice and it slices through this thin stuff with ease.
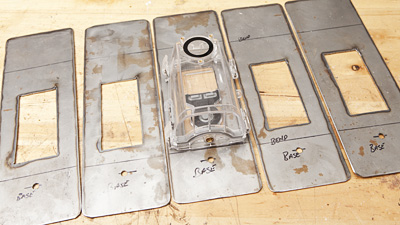
Here are the mount blanks after cutting and grinding the corners to remove sharp edges. I drilled a hole in each base for a mounting screw which will go into the weather resistant housing. I also drilled two small holes along the left and right edges for a cable ties to run through the side housing holes and through the steel.
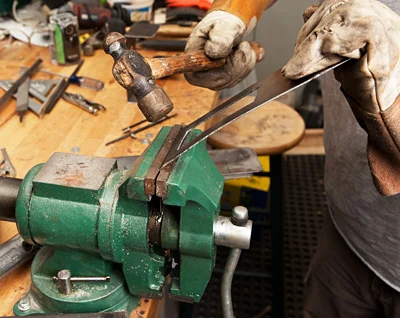
Next is bending the blanks into the final form. A large vise and hammer took care of this task without much effort.

Here are the mounts after cutting and bending.

I weld tabs on the bases which will bolt, typically to another bar, for the mount anchor. Without a welder I would probably use angle iron and drill and bolt it to the base.
Below left is the finished construction trailer roof mount. The camera bracket is adjustable for tilt. The post is welded to a drilled plate which is mounted to a wood board. In the first picture the sandbags are over the wood and everything is painted to prevent rust and rot.
The last image is my complex tree mount, before painting, which admittedly, grew into something much more complex than I had planned. At this length the wind would cause unwanted camera movement. I built this mount so the cross braces could either be bolted to each other or to the tree which is what I did with the final mounting. The large angle bracket is attached with two lag screws and each cross bar have one lag screw into the tree.

Finished construction trailer mount.

Tree mount before painting.